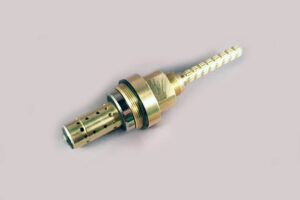
A malfunctioning shower can be quite a headache, causing inconvenience and frustration. One of the most common culprits behind shower woes is a faulty shower cartridge. The shower cartridge, also known as the faucet cartridge or shower valve, plays a critical role in regulating water flow and temperature. When it starts to malfunction, it can result in dripping faucets, inconsistent water temperatures, and reduced water pressure.
Fortunately, replacing a shower cartridge is a relatively simple DIY project that can save you both time and money. In this step-by-step guide, we will walk you through the process of replacing a shower cartridge.
Tools and Materials You’ll Need
Before diving into the process, make sure you have the following tools and materials at your disposal:
- Adjustable wrench
- Screwdriver (Phillips and flathead)
- Plumber’s tape
- Replacement shower cartridge
- Towels or rags
- Safety glasses (optional)
Step 1: Turn Off the Water Supply
When performing plumbing operations, safety should always come first. To avoid any accidents, start by turning off the water supply to your shower. Look for the shut-off valve, which is usually located near the shower or in the basement. To fully stop the water, turn the valve clockwise.
Step 2: Remove the Shower Handle
Using a screwdriver, remove the screw or set screw that holds the shower handle in place. This screw is typically located in the center of the handle or behind a decorative cap. After taking out the screw, carefully remove the handle.
Step 3: Access the Shower Cartridge
After removing the handle, you’ll have access to the shower cartridge. Depending on the shower design, you may need to remove additional parts such as a trim plate or escutcheon to access the cartridge. Use a screwdriver to remove any screws or fasteners holding these parts in place.
Step 4: Remove the Old Shower Cartridge
With the cartridge exposed, use your adjustable wrench to loosen and remove the retaining nut that holds the shower cartridge in place. Turning the nut counterclockwise should do the trick. Be prepared for some water to leak out when you remove the cartridge, so have towels or rags ready to catch any spills.
Step 5: Inspect and Clean
Before installing the new shower cartridge, take a moment to inspect the inside of the valve for any debris or mineral buildup. If you notice any, use a cloth or an old toothbrush to clean the inside of the valve thoroughly. This step will help ensure that the new cartridge functions optimally.
Step 6: Apply Plumber’s Tape
Wrap a few layers of plumber’s tape around the threads of the new cartridge. This will create a watertight seal when you install it and prevent leaks. Make sure the tape is wrapped in the same direction as you will be turning the cartridge.
Step 7: Install the New Shower Cartridge
Gently slide the new shower cartridge into the valve, making sure it aligns correctly. Once it’s in place, use your adjustable wrench to tighten the retaining nut by turning it clockwise. Be careful not to overtighten, as this can damage the cartridge or the valve. Make sure it’s snug and secure.
Step 8: Reassemble the Shower
Now that the new cartridge is installed, it’s time to reassemble the shower. Start by replacing any trim plates or escutcheons you removed in Step 3. Then, slide the shower handle back into place, aligning it with the cartridge stem. Secure it by tightening the screw or set the screw with your screwdriver.
Step 9: Turn On the Water Supply
With the shower reassembled, it’s time to turn the water supply back on. Return to the shut-off valve and turn it counterclockwise to restore water flow to the shower.
Step 10: Test Your Work
Before considering the job complete, turn on the shower to test the new cartridge. Check for leaks and ensure that the water flow and temperature are now working properly. If you notice any issues, such as leaks, drips, or temperature fluctuations, you may need to make some adjustments or ensure that the cartridge is properly seated.
Step 11: Final Checks
Finally, inspect the shower for any loose parts or minor leaks. Double-check the handle and trim plate to make sure everything is securely in place. Wipe away any water or residue with a clean cloth.

Conclusion
Replacing a shower cartridge, also known as a faucet cartridge or shower valve, can be a simple yet effective way to restore your shower’s water flow and temperature control. By following the step-by-step guide outlined in this article, you can tackle this DIY project with confidence, saving both time and money. Remember to prioritize safety, turn off the water supply, and follow each step carefully. With the right tools and a little patience, you can enjoy a fully functional and leak-free shower once again.
If you’re looking to take your bathroom renovation or remodeling project a step further, consider reaching out to The Shower Company. Our expert team is ready to help you transform your bathroom into a stylish and functional space that suits your needs and preferences. Don’t hesitate to contact us for professional guidance and exceptional service. Upgrade your bathroom with The Shower Company today!

